HUSBAND | FATHER | PROFESSOR | MUSICIAN
|
HUSBAND | FATHER | PROFESSOR | MUSICIAN
|
|
| |
|
HUSBAND | FATHER | PROFESSOR | MUSICIAN
|
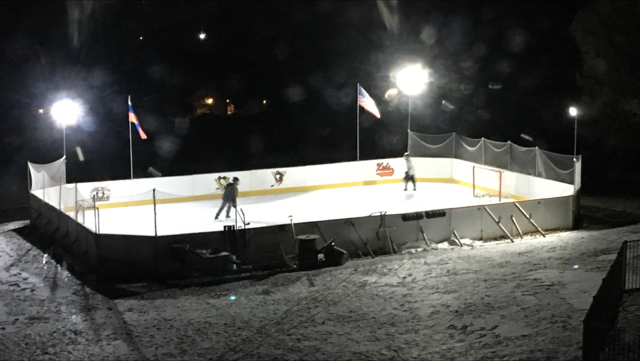
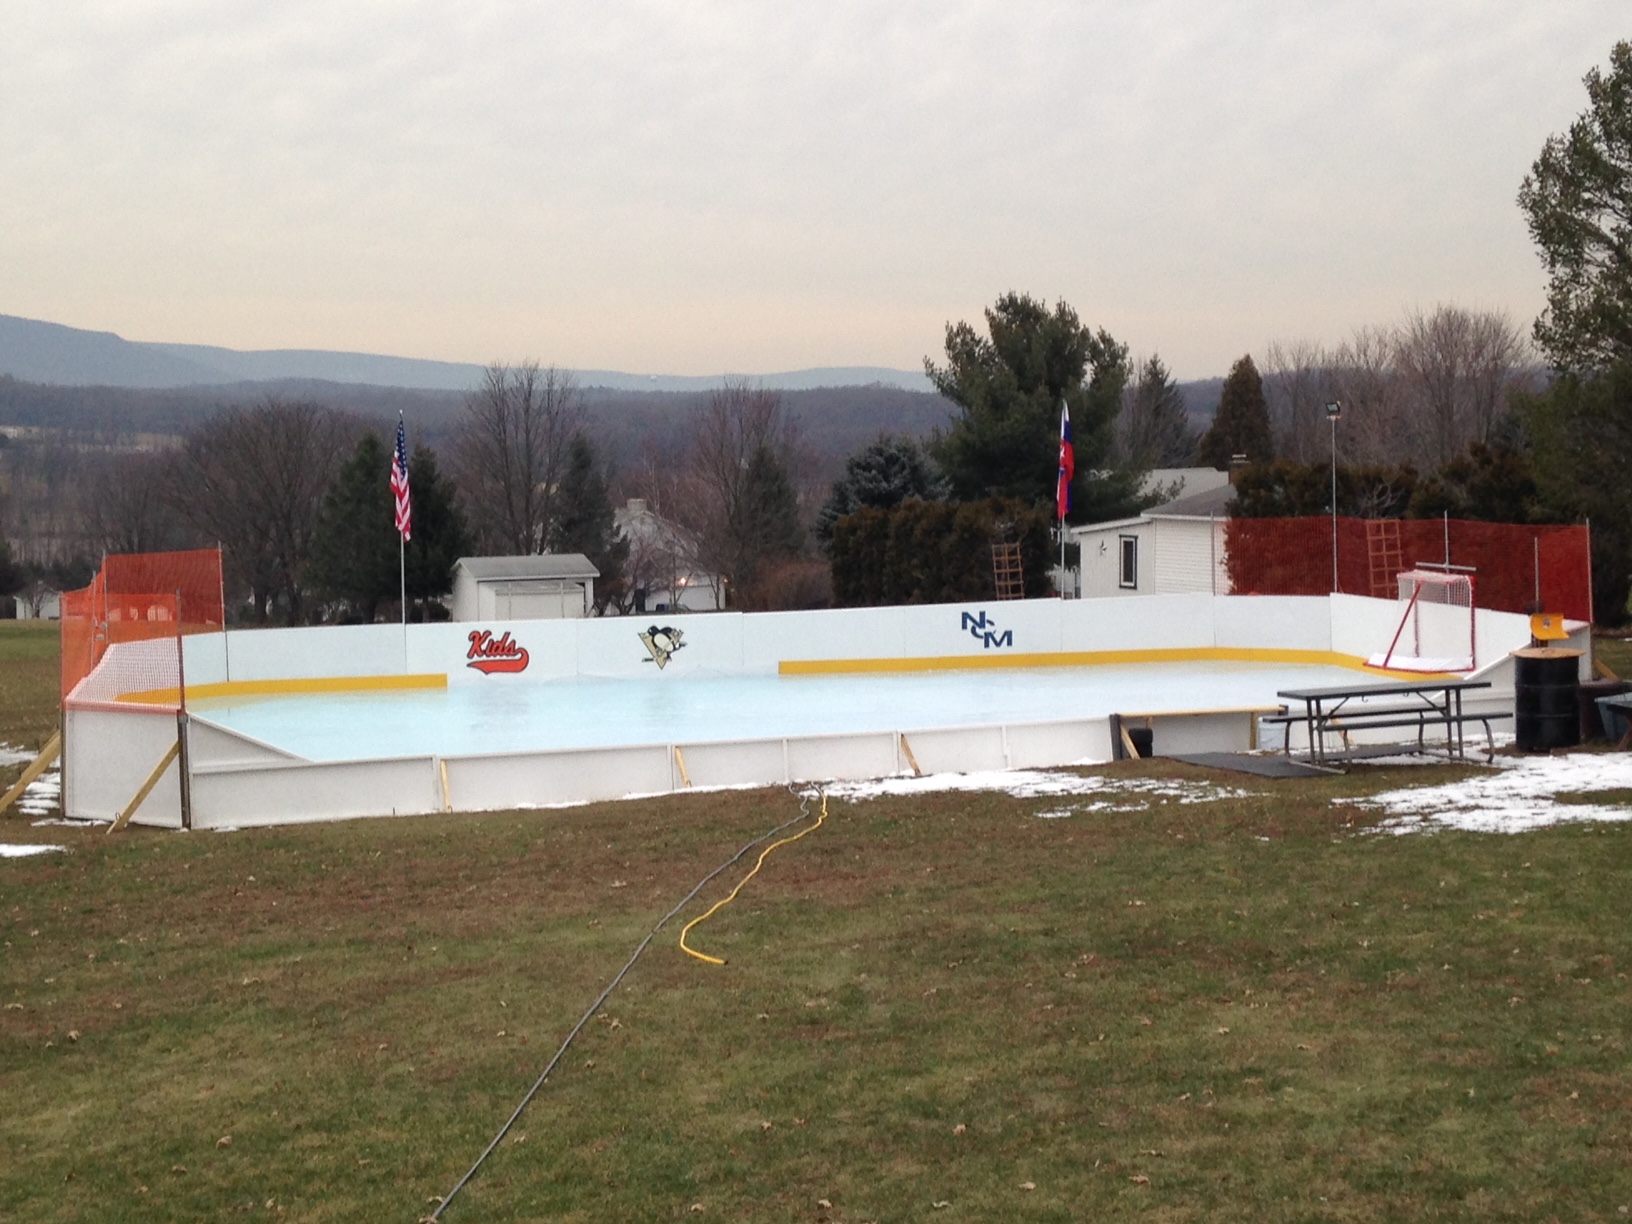
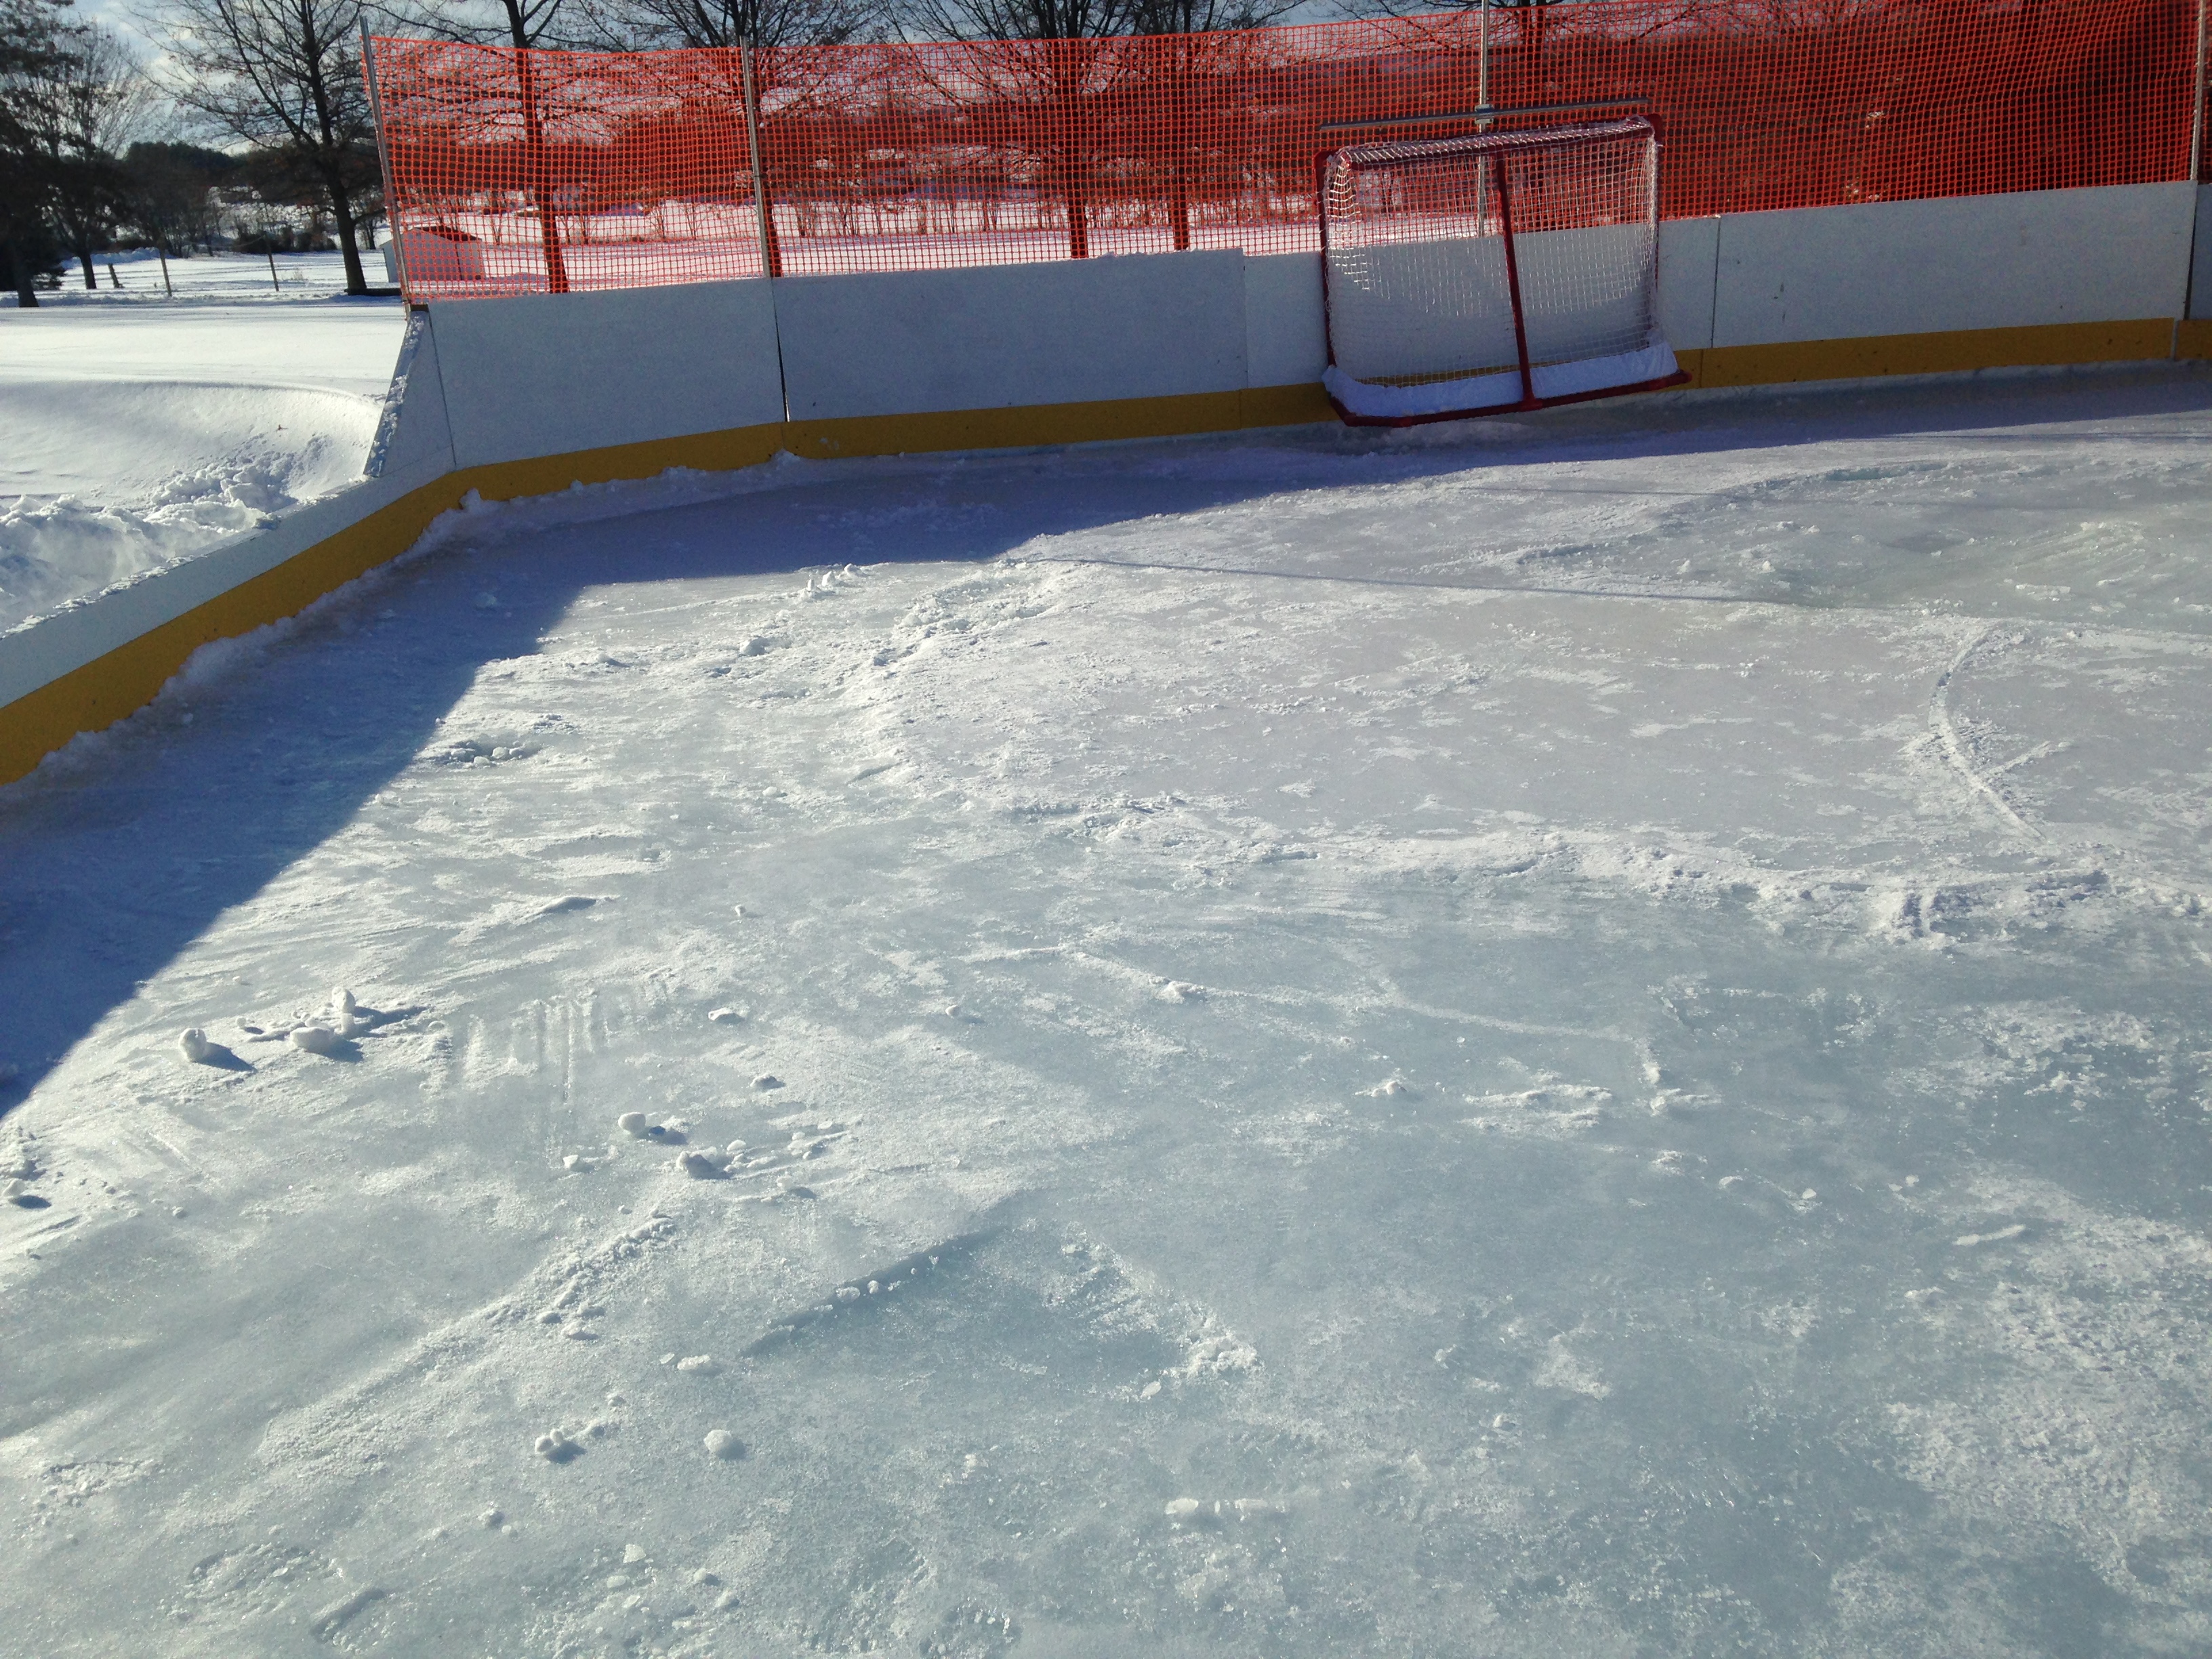
OUR BACKYARD HOCKEY RINK (ODR) 36'x56'
Winter 2018-19
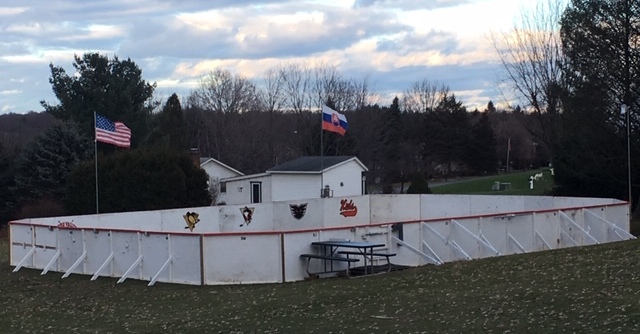
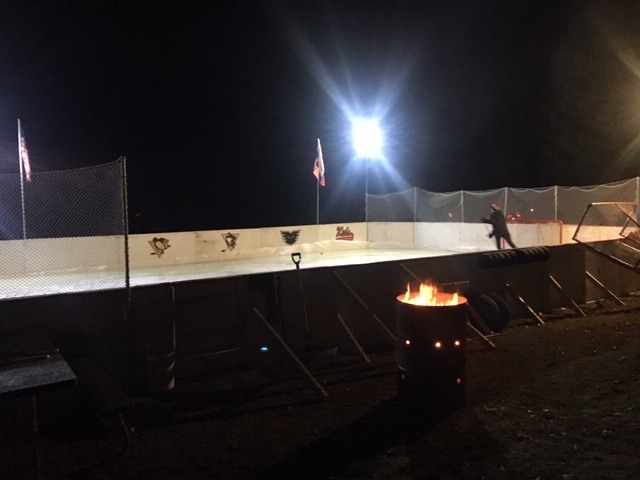
UPGRADES - painted all support 2x4's white, hoping it will reduce the melting of the snow near the walls of the rink, which softened around the edges. in addition, our grass has recovered from the leveling we did a year ago, so shouldn't be any bare dirt showing around the rink this year, which tended to warm up and soften the ice around the sides that got full sun (west/left & south/front). also made new yellow kicker plates, as last year's got all funky from improper stacking (aka being lazy). also purchased an electric snow thrower that i'm hoping will speed up the removal of light snow. lastly, added my son's team logo (Lehigh Valley Phantoms Bantam AA)
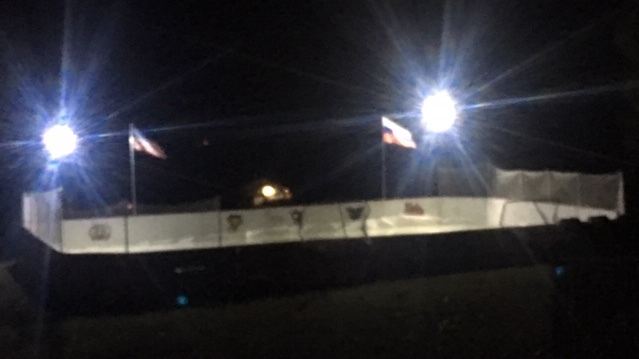
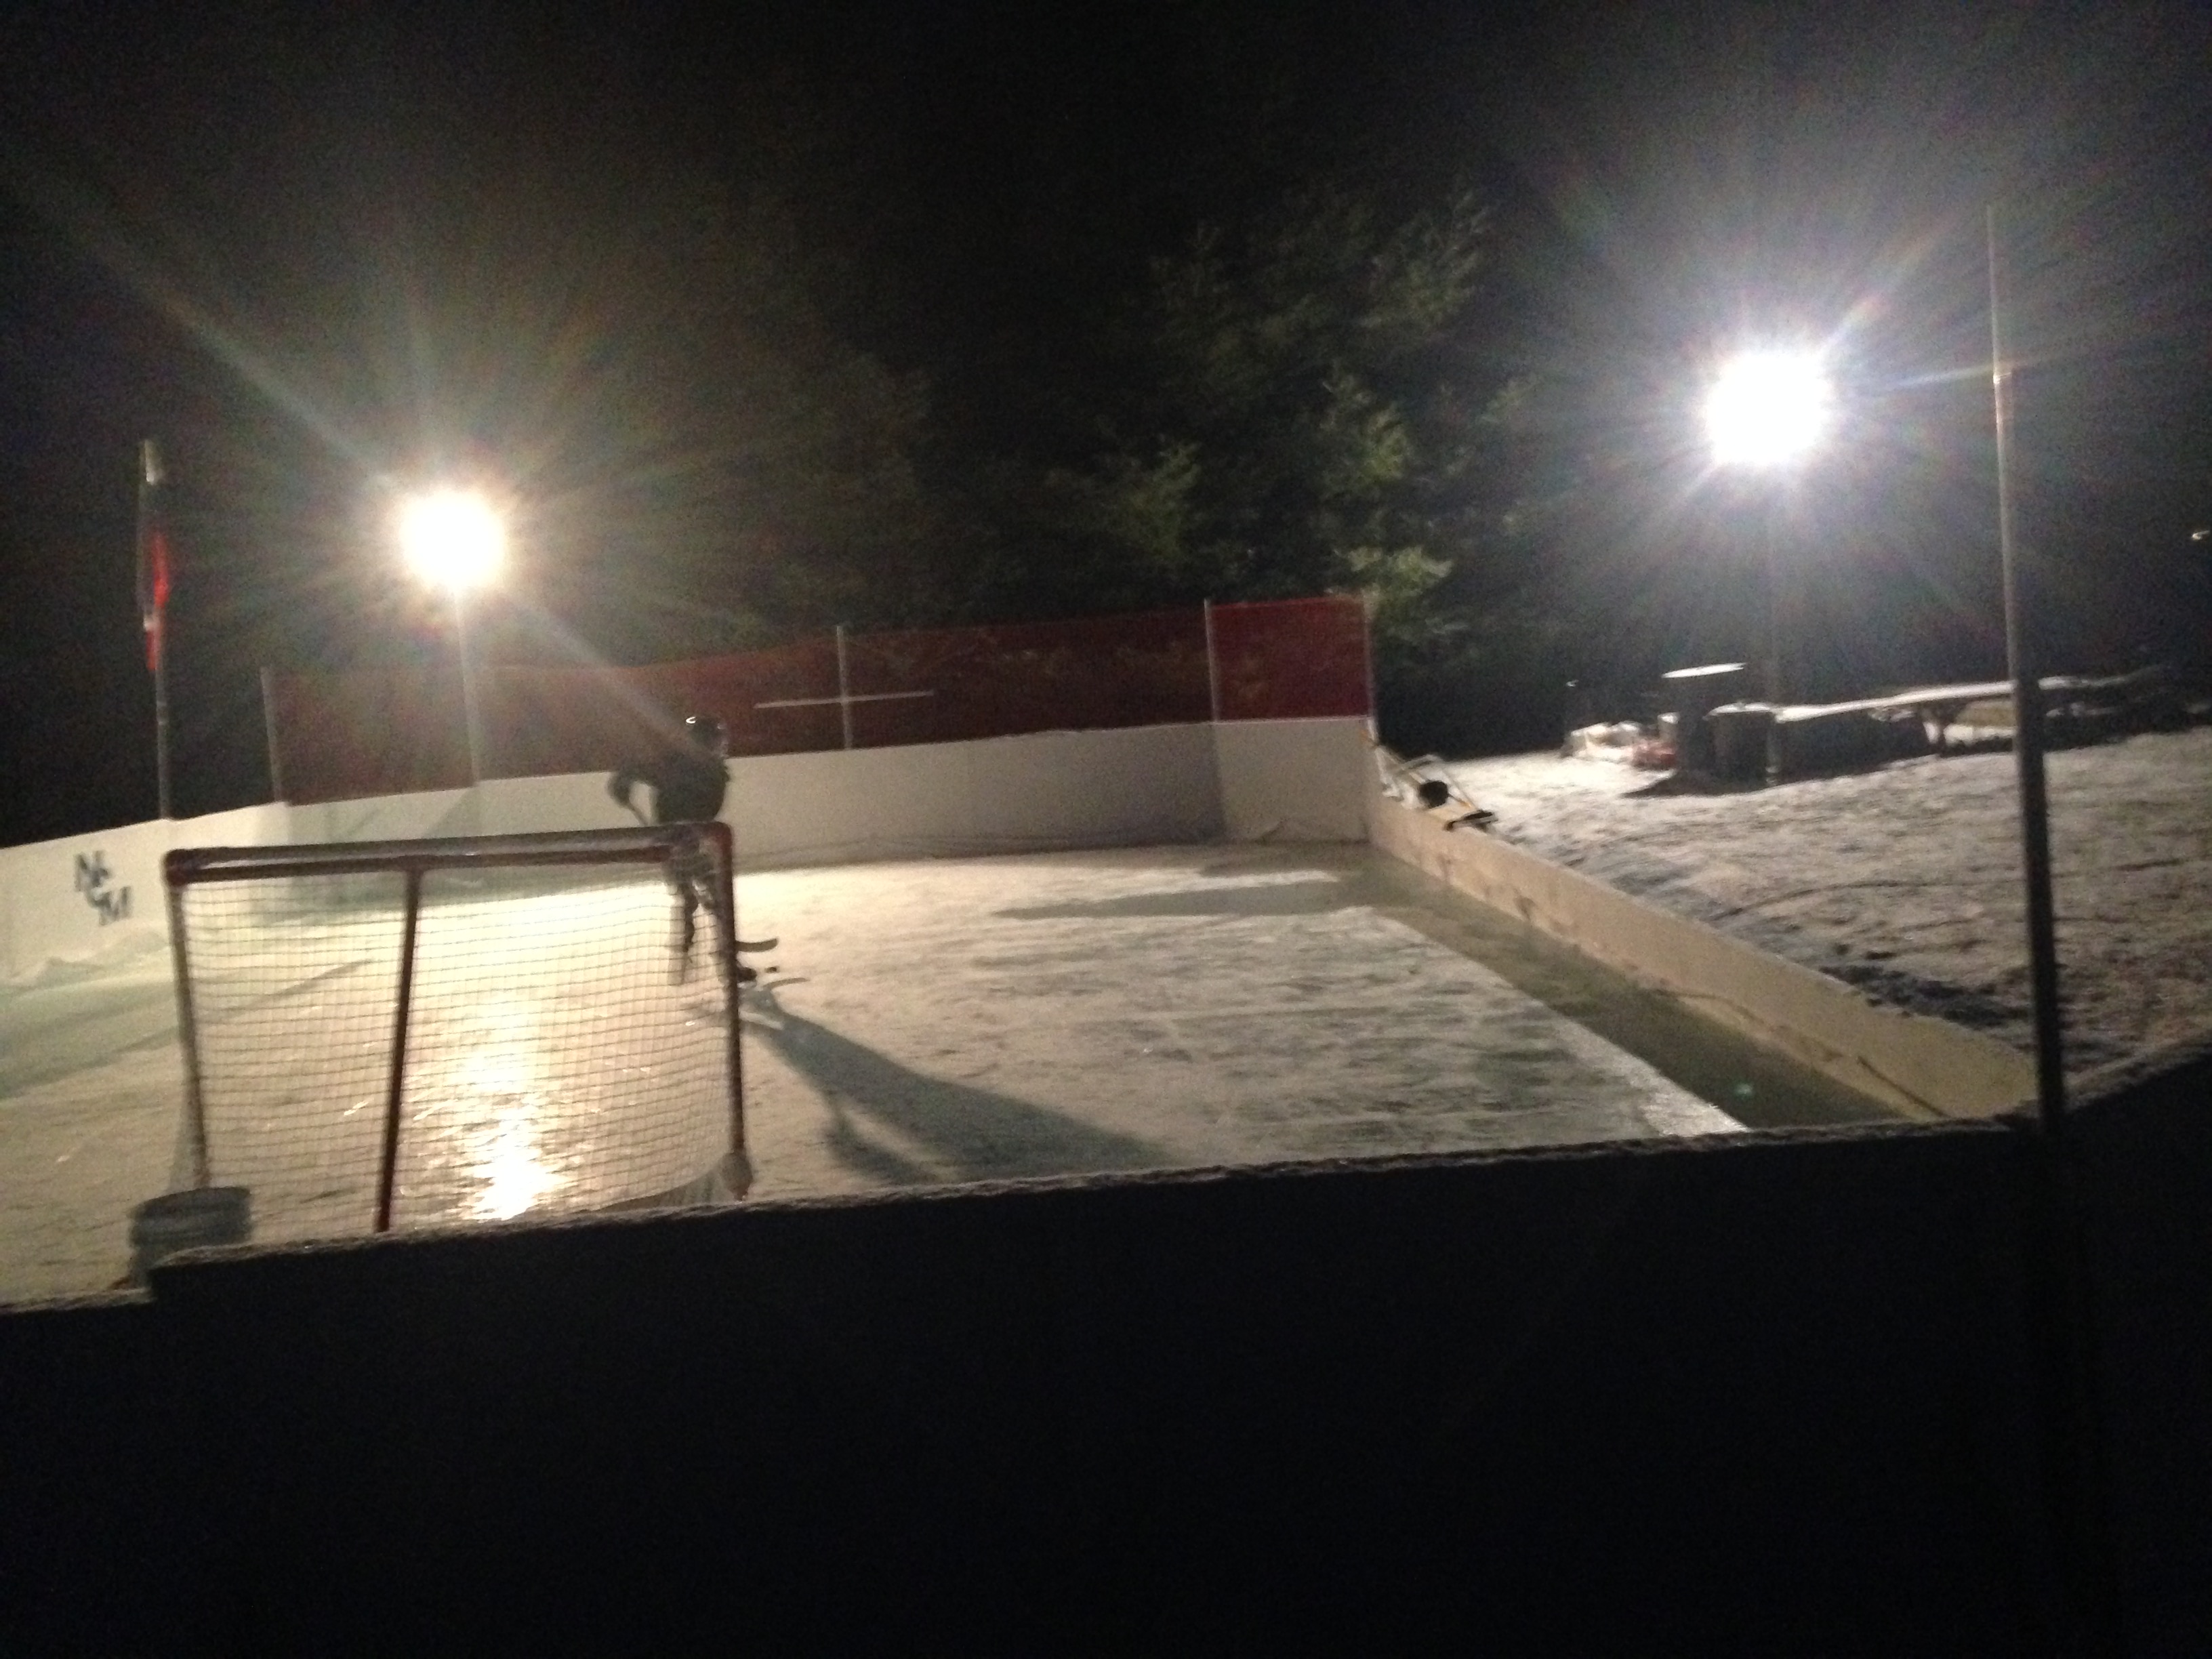
UPDATE - had ice for 1 evening on 12/10 (photo above right), then major warm up and nothing since. Looking like after Christmas before it's cold again.
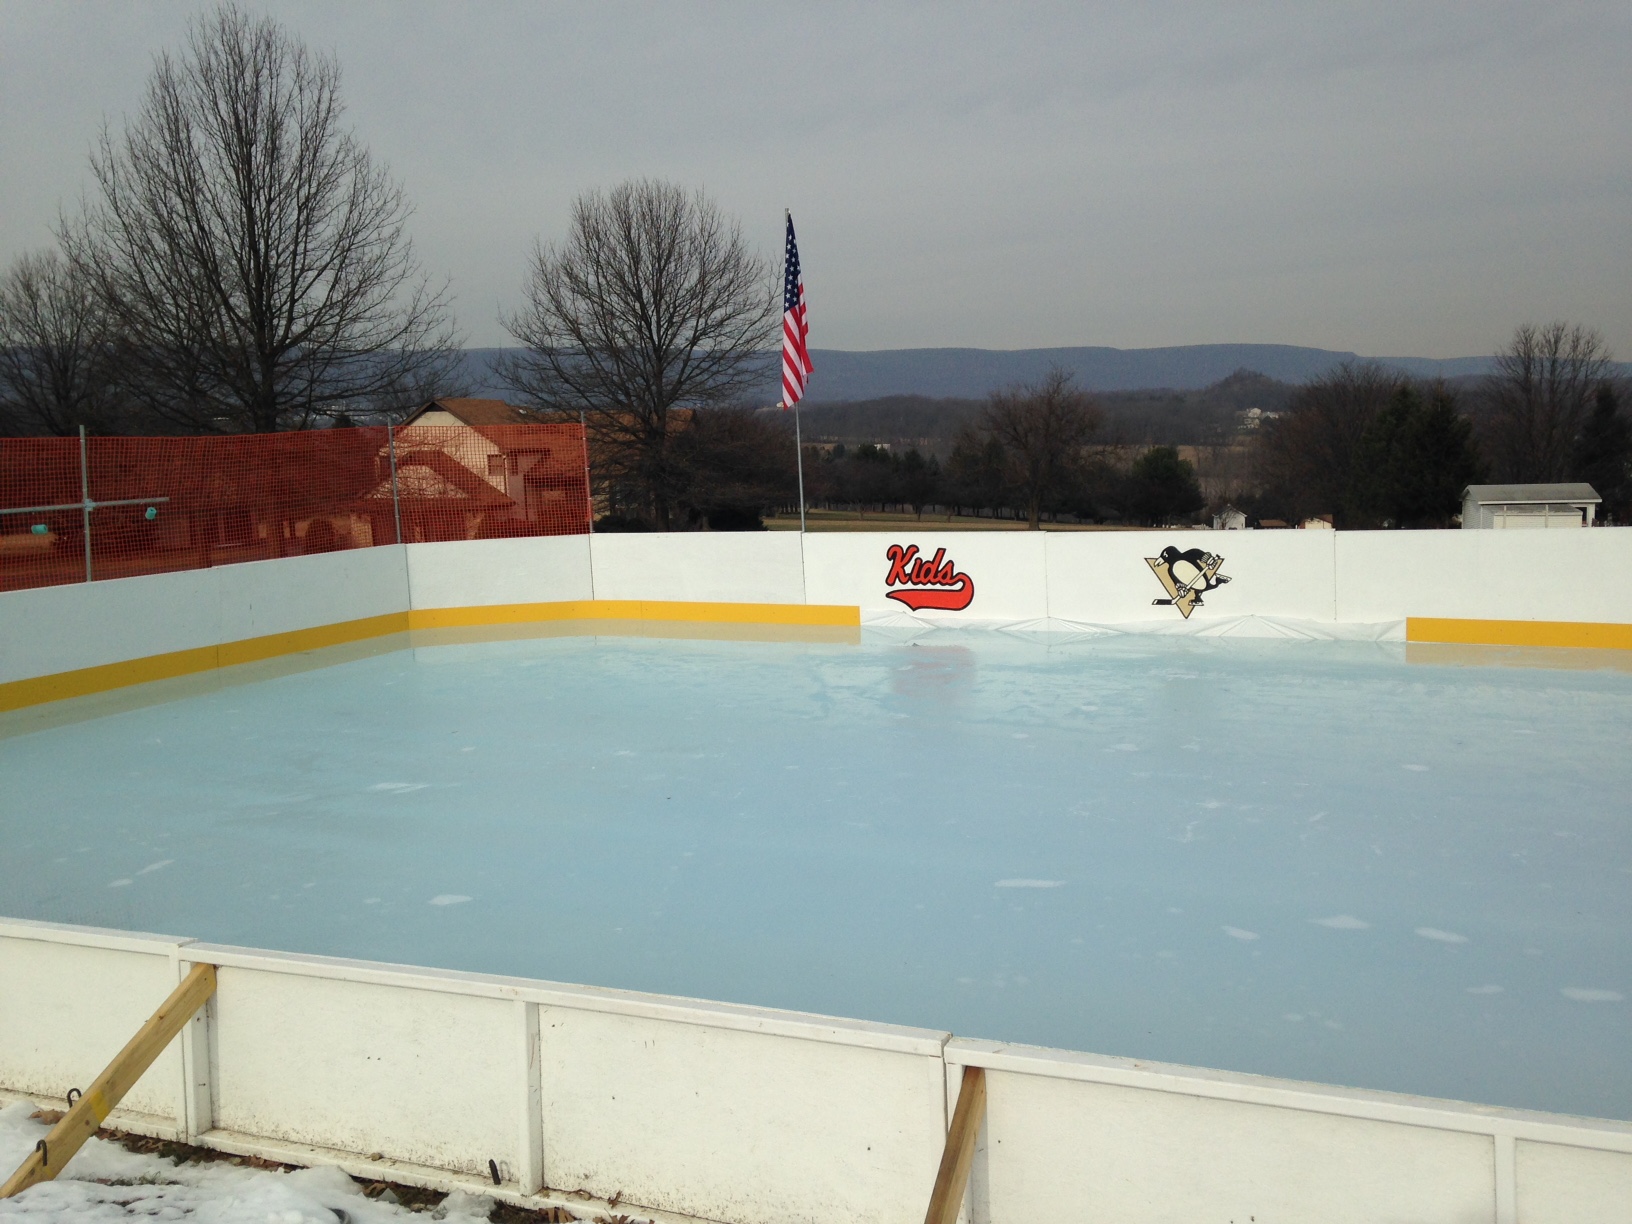
Winter 2017-18
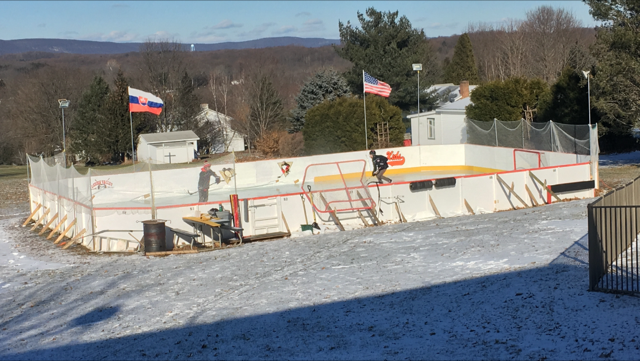
UPGRADES - went to 36' wide, and made all board 4' / full-height. it helped keep pucks in the rink, added some wall rigidity, and a little shade on the near side ice. also tossed the orange snow fence and used golf netting. the orange stuff worked before he found his slapshot.
Winter 2015-16
THE BUILD
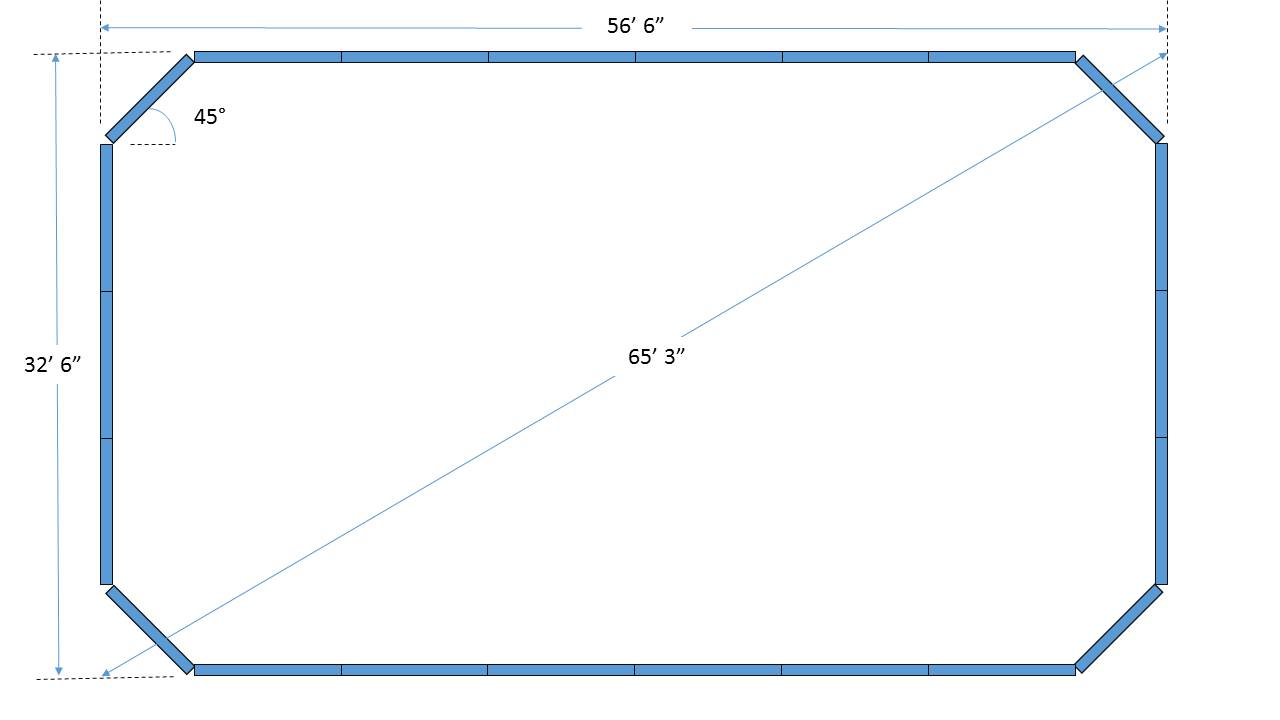
SIZE - 56'x32'. i went with this size based on the following: the dimensions are multiples of 8' which made it easy to use 4x8' panels and 2x3x8's for boards // it didn't take up the entire yard // the cost of a 60'x40' liner was about $200 // it would be mostly kids on the ice who don't need as much space // lastly, coaches say the game played on small area is the way to get better due to lots of touches (at least in soccer and hockey). i originally designed it as a rectangle, but heard from others that corners attract snow, are a pain to keep clean, and pucks get stuck there. so i used a 6' panel at a 45° to the sides for each corner which worked well.. also, i can always go bigger by adding another 8' panel in either direction.
MATERIALS
PANELS: 4x8' sheets of 7/16" OSB (from Lowe's, had blue on the edges), as they were the cheapest option at around $14/each. i built a frame behind each panel from 2x3x8's. i used long, exterior screws to fasten together, then put 2 coats of exterior white on them, front, back and sides. i estimate each panel cost roughly $20 when finished. i had 22 panels in all, but 6 of them were 1/2 height (2x8').
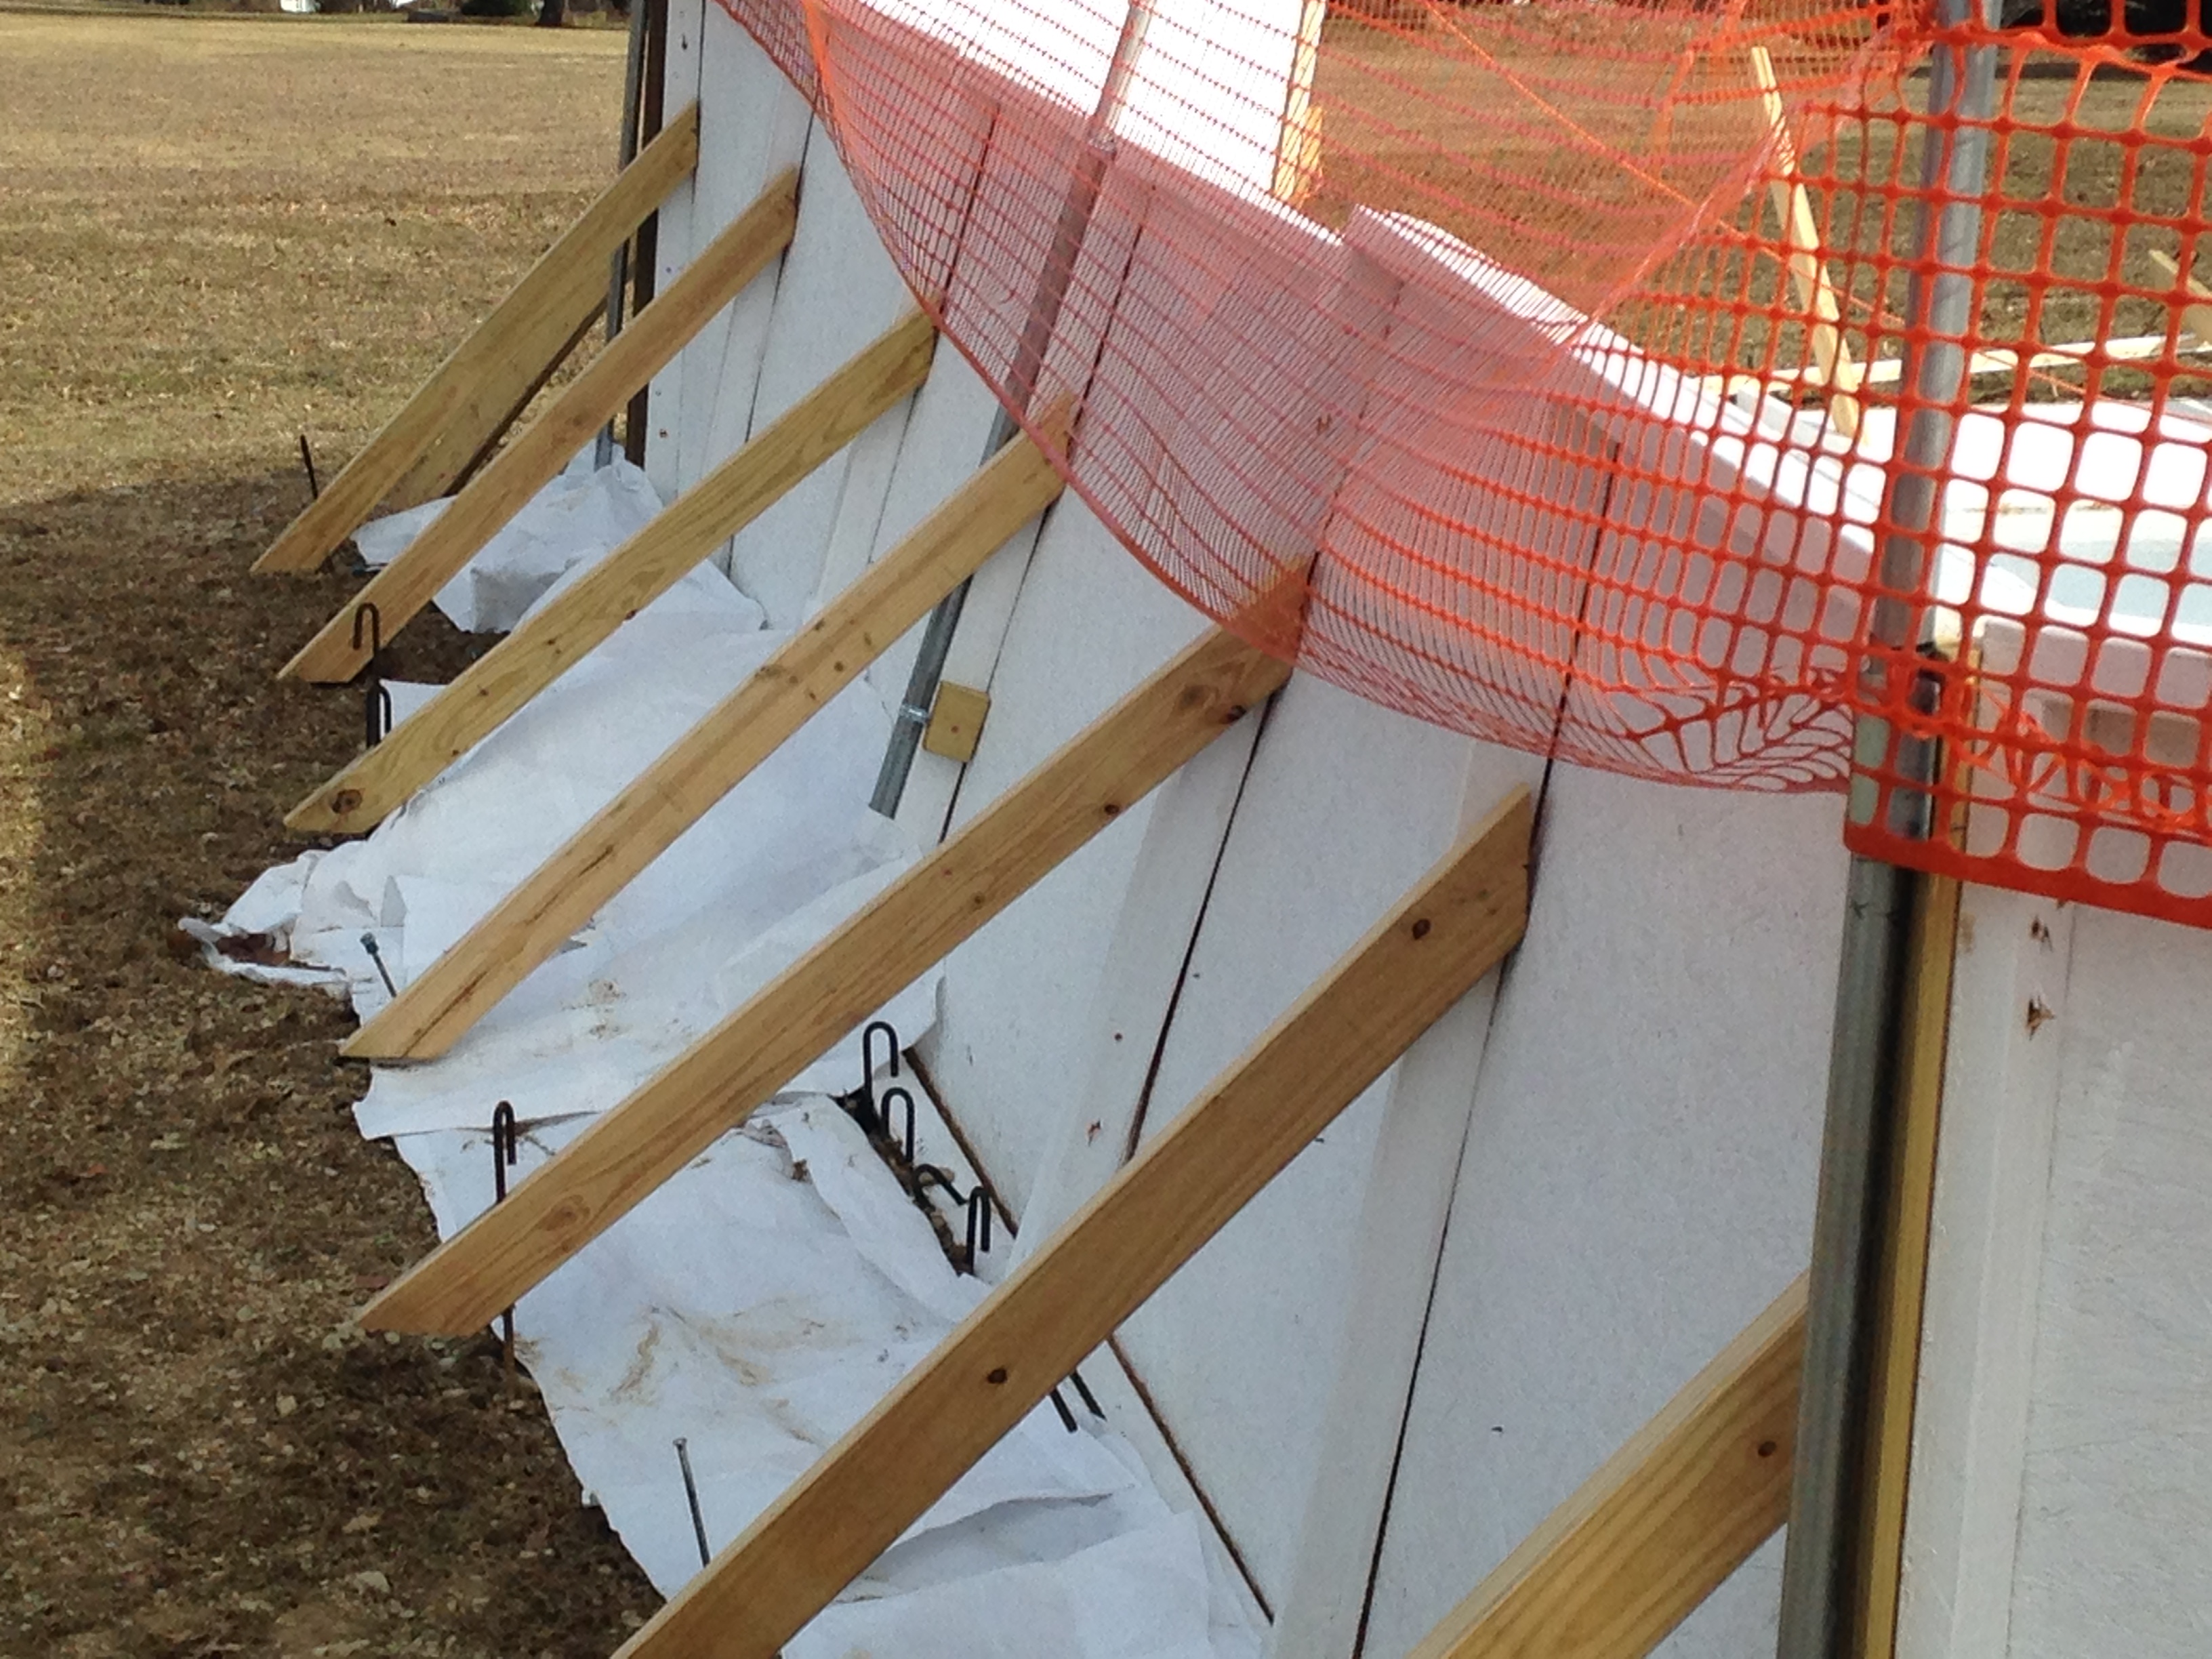
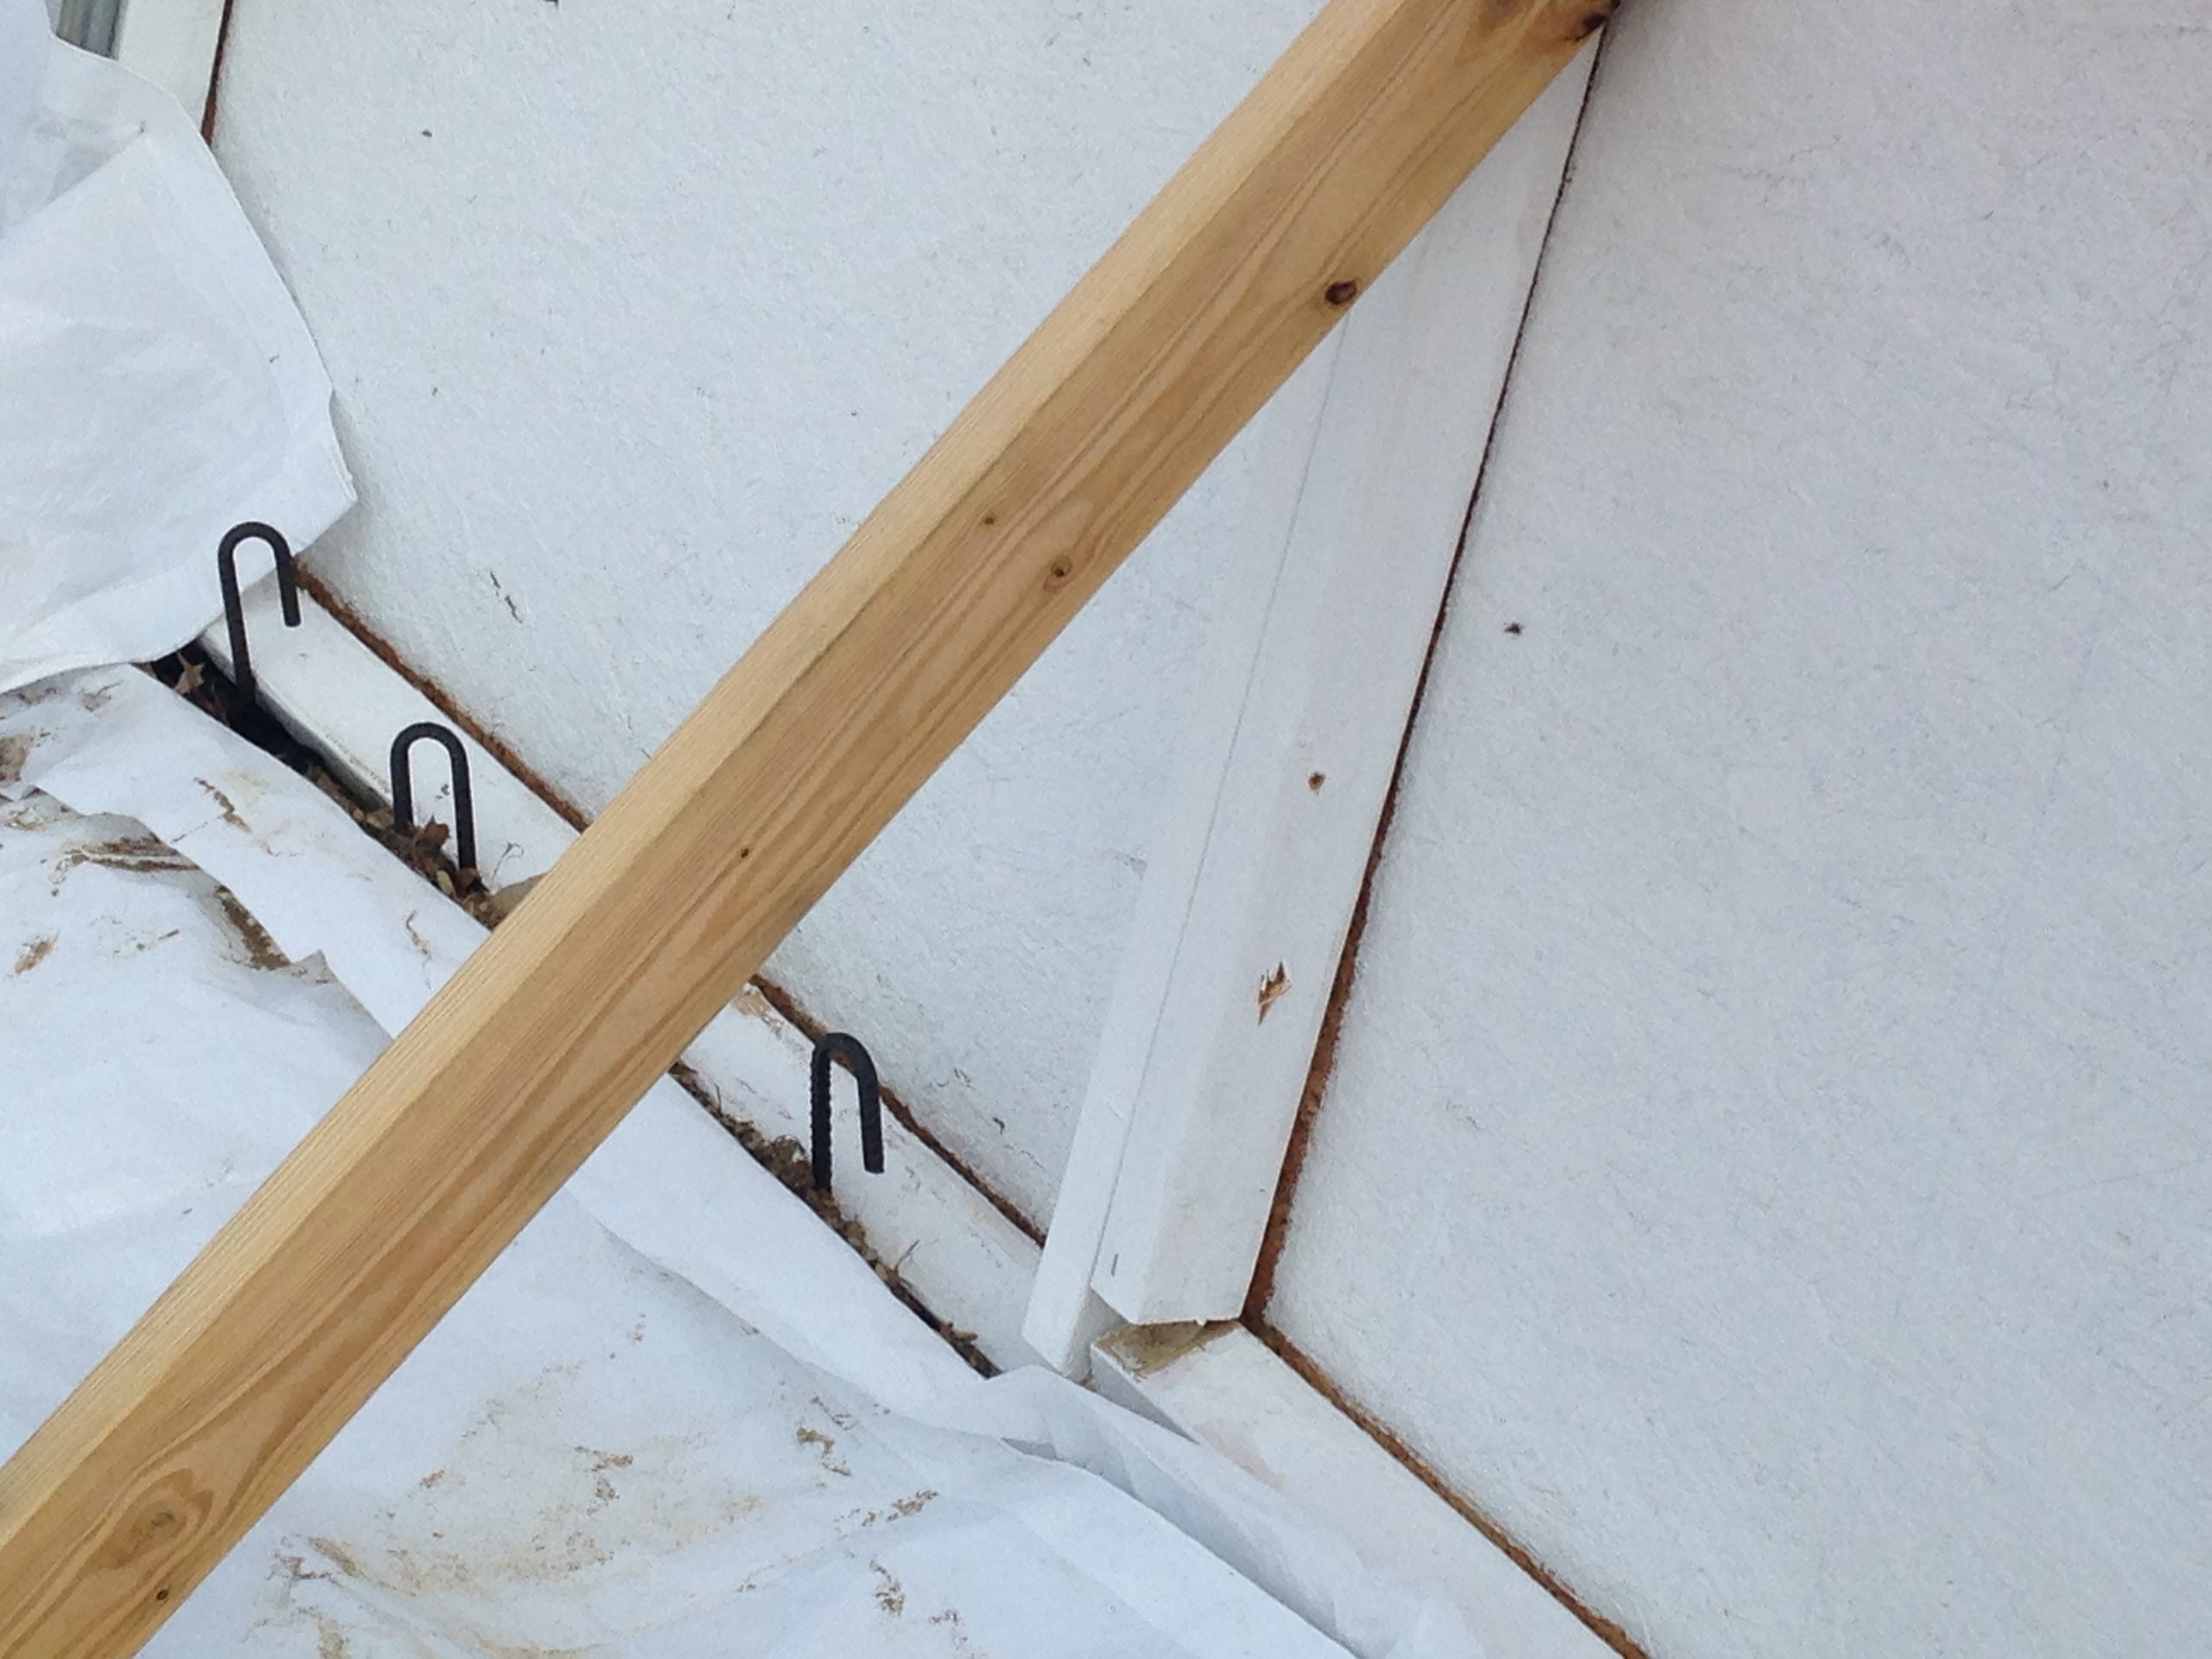
SUPPORTS: i drilled 3 holes along the bottom of each panel, and drove a J-hook 18"x0.5" rebar stake through each. i found the j-hooks on eBay in packs of 20 for about $2/each. they worked well while the ground was frozen, but slid/moved under the water/ice pressure when the ground warmed up or got wet. i had the most trouble in the deep end where the water was 16" deep. worked well where i only have 5" of water. i also cut 2x4x8's into angled supports that connected 3' up the back of the panel to keep them from being pushed or knocked over. i used wood screws to attach to the boards, and put a rebar ground stake in the other end to hold into the ground. worked pretty well, again, while the ground was frozen.
PAINT: this was actually one of the bigger expenses of the project. since our rink wasn't in the shade, i needed to paint everything white. two coats, both sides, used up a lot of paint. this probably took the most time too.
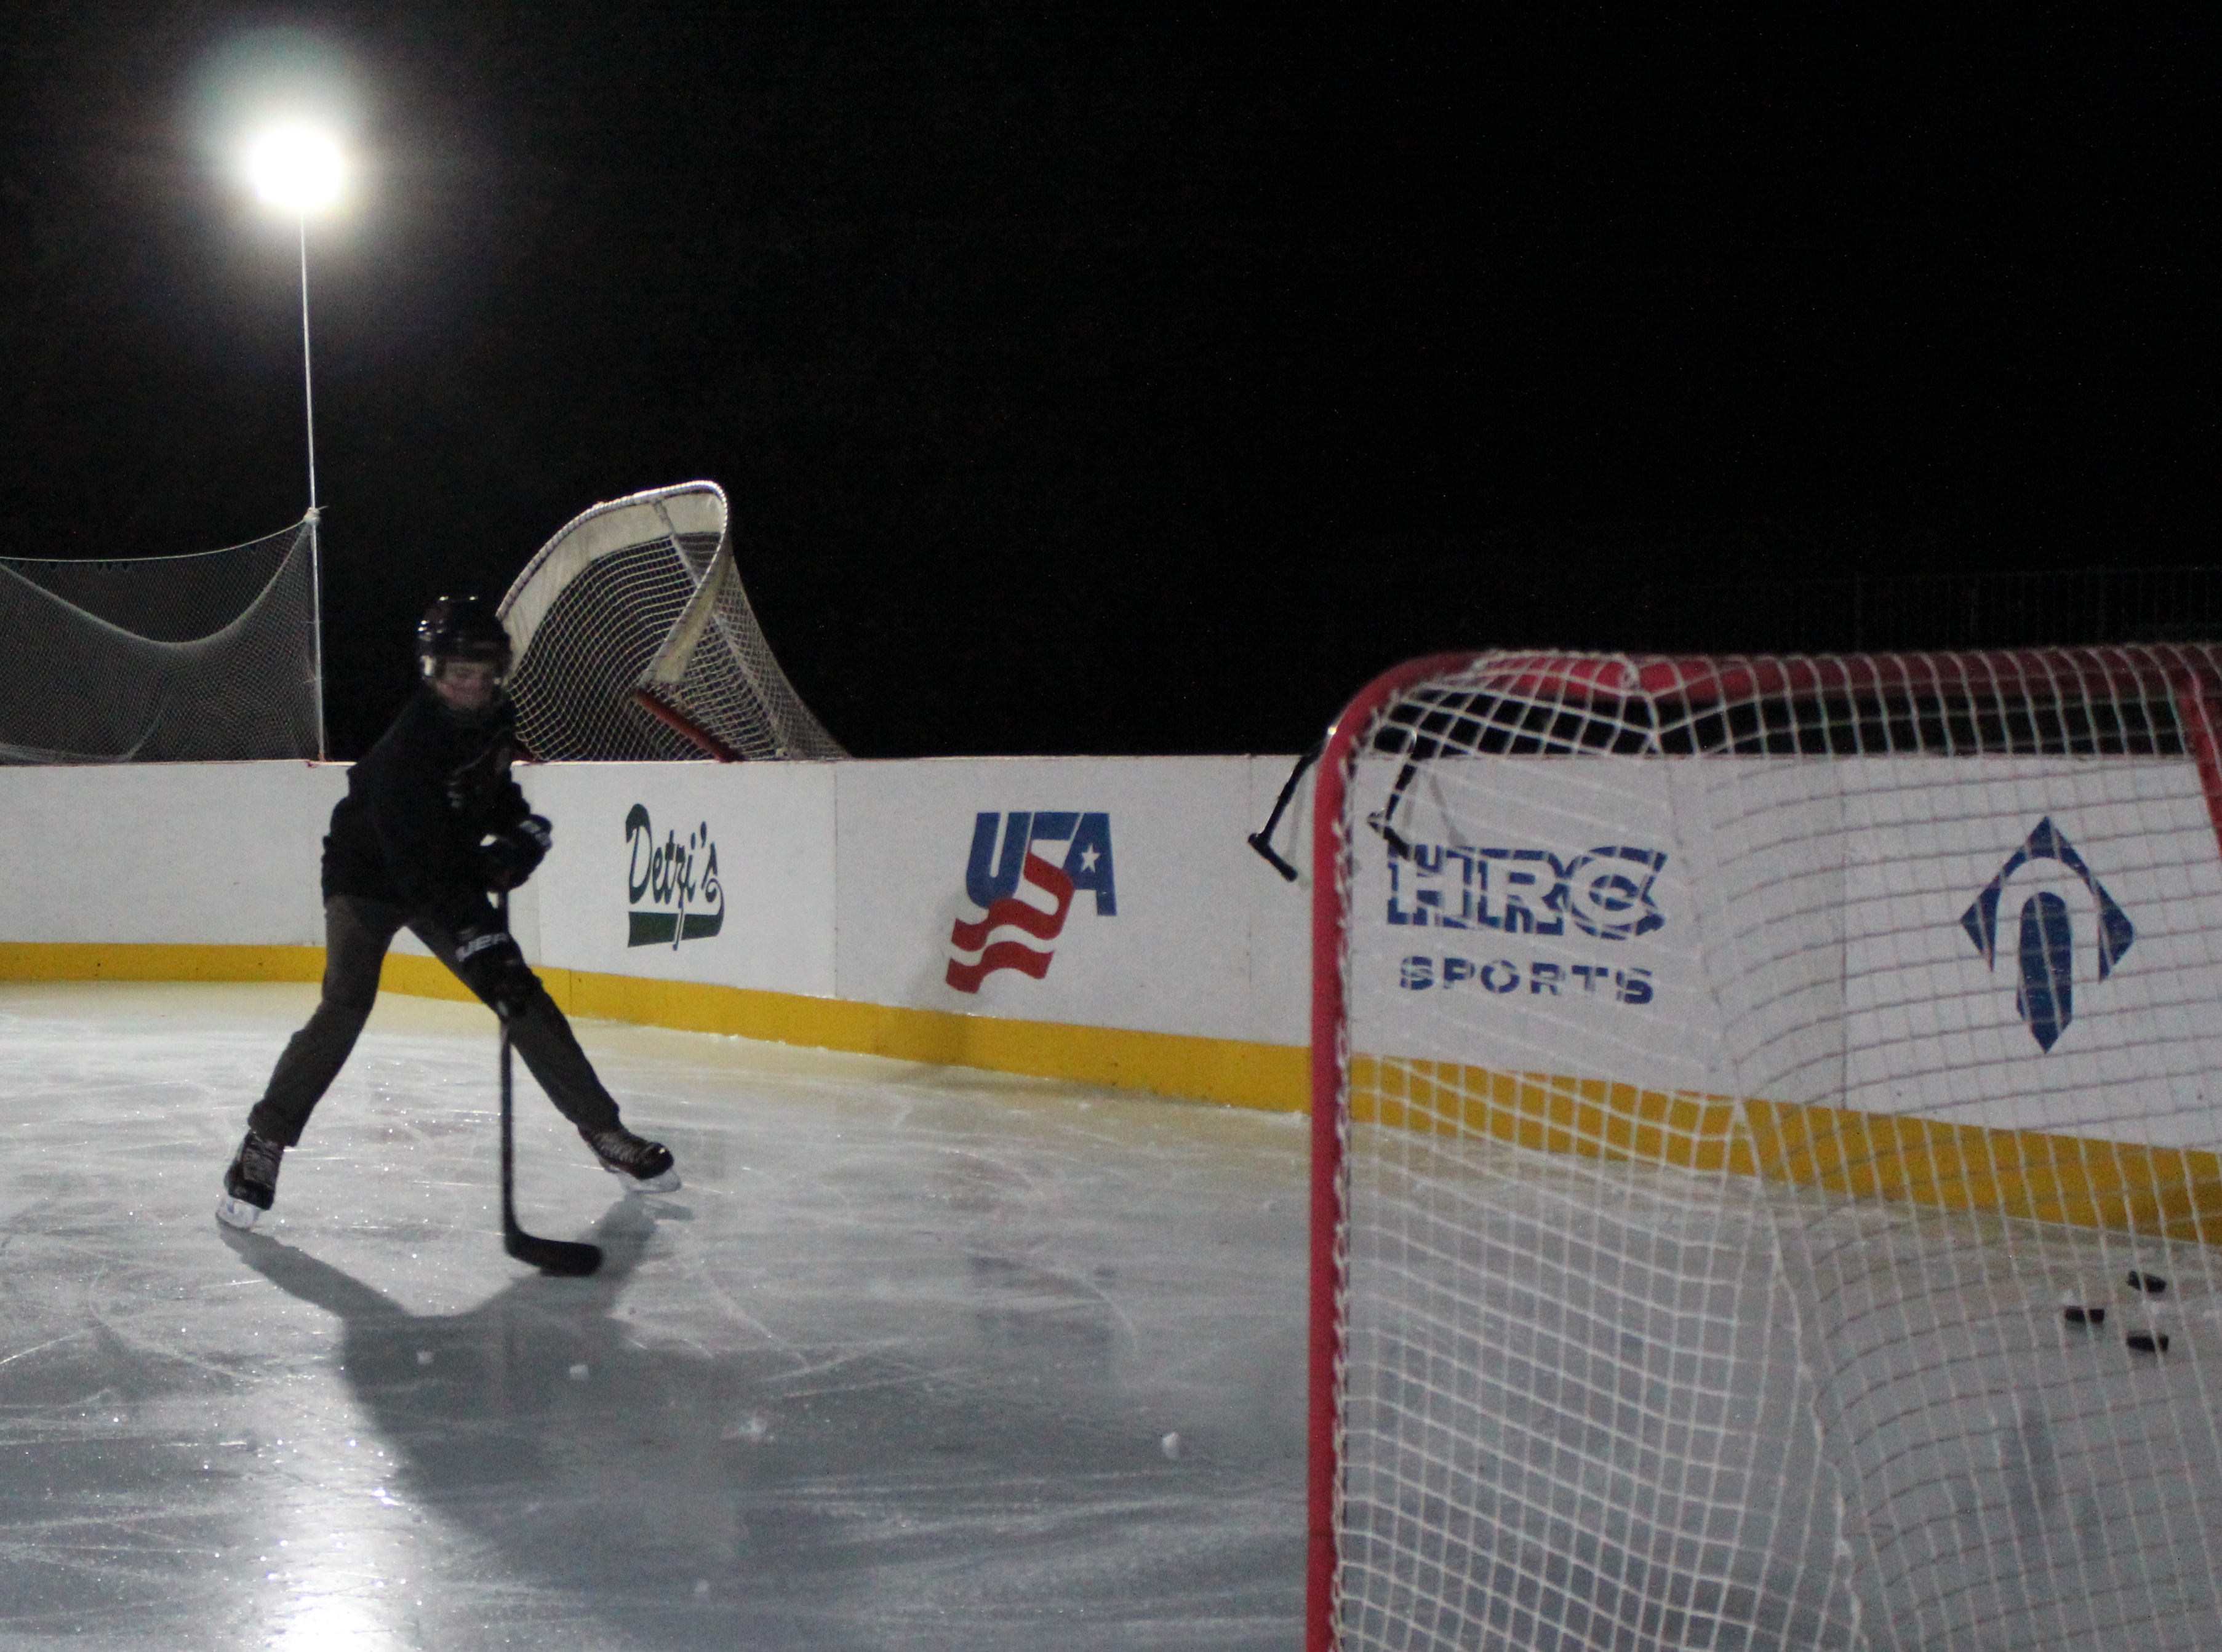
NETTING AND SUPPORT POLES: my brother-in-law gave me a bunch of 1 1/2" inch galvanized pipe he didn't need, and i used them at both ends to hold the orange snow fencing as well as the lights and flags. i screwed the poles onto the backs of the boards. next year i'm going to drill holes into the boards for the poles to slide down into. should be sturdier, and less work to install. it will also keep the fencing near the front (ice side) of the panel instead of the back side. we found pucks sometimes would fall between the netting and the back of the panels. not a big deal, but worth trying something different. the snow fencing i got at the big hardware store.
LIGHTING: i have both halogen work lights and LED lights up on 10' poles. really don't need a ton of lighting at night, but i had the lights. i installed a remote on/off outlet (~$14 on eBay) where i plug in the lights, which was REALLY nice. just hit the remote from inside the house and lights are on.
YELLOW KICKER PLATES: found a 4x8' sheet of some thin (1/8"?) sub-floor material at the big store, and had the guy rip in 8" wide strips (wanted 6" but 8" is the smallest they will rip). painted with a gallon bright construction yellow paint from the big store. screwed onto the boards once the ice was frozen. came out nice i think, and it also protects 8" of liner that sticks above the ice. i cut the liner at the top of the kicker plates and tossed. they also worked well when my son tossed pucks off them. decent rebound.
THE REALITY, THE LESSONS LEARNED & WHAT I'LL DO DIFFERENTLY NEXT TIME
Being my first rink, and never having played ice hockey, i think it turned out really well. the famous "night before the big storm" that i talk about below was, as they say "priceless". we had near-perfect glass-like ice, and i was out at night, lights on, skating with my two sons - the older playing hockey while i skated with my younger one who is just learning to skate. wouldn't trade that for anything. my wife joined us later. if that's the last time we skate this year, it was worth it (it wasn't, but it took almost a week to recover the ice to flat & smooth). but i'm still hoping we'll be up running again soon. in the meantime, i'm posting the good, the bad, and the "need to fix for next year" below. i learned a lot from all the other backyard builders that have gone before me and posted on the web, so i'm hoping what i add here will help someone and save them some headaches, so they can spend their time on the ice with their kids. i certainly don't know as much as some of the others on the web, but i'm happy to share what i've learned, so email me if you have any q's. i'll try to post some pics too to help with my explanations.
GROUND - my neighbor helped get the ground much closer to level (thanks John & NuCor Mgmnt). before we started i was over 2.5 feet off level, but got it closer to just over 1-1.5 foot off in the deeper end. but that extra depth still took a TON of EXTRA water to fill (60+ hours with the garden hose). thankfully we have a well, but i'm sure my well pump wasn't happy (and it would be a bear to replace it during the frozen winter months if the pump died). but for next year i plan to get someone to come in and make this part of the yard as perfectly level as possible. i know that yards should always have some slope for drainage, but i'll put up with a wet area of the yard after it rains if i can have a level surface for the rink. though i'll spend additional money on leveling, i'll save time in filling up AND in waiting for the rink to freeze (the deep end never actually froze completely all winter, and at some point i got a leak and all that water drained out leaving my ice tilted - but more on that below).
TARP/LINER - i'm planning to use this year's liner as the under-liner for next year, and buy a new liner next year. the current liner has a leak somewhere, which has resulted in the ice surface dropping almost 3" over the past two weeks. i still have lots of ice, so it was probably all the water under the ice that never froze that leaked out. but again, wasted water. update: we had a long warm spell and more water has drained out. i'm thinking when the ice on top dropped it tore the liner and i can't locate it. right now the ice is 6" lower since the big 30" snowstorm came. my current tarp that i bought on eBay has the 'weave' pattern like most brown/gray tarps from the big stores. next year i'm going to try the non-weave layered liners which look more like a thick (non-patterned) garbage bag material, only white. a little more expensive, but if i can avoid leaks, it'll be well worth it. update: i sold the old liner, and will buy a new one. i think there are other holes in it i can't find.
BOARDS - i'll make all the board 4' tall (currently about 2/3s of the walls are 4', with the closer side where we step onto the ice only 2' tall). this will provide some additional shade from the sun on the southern side of the rink. i'll also need to build a gate/door to access the ice. right now everyone steps over the 2' boards, which is a little cumbersome.
BOARD SUPPORTS - the rebar and 2x4' supports worked well as long as the ground stayed frozen. during the 2 week warmup in mid-January i got a leak, which soaked the ground around the deep end, and the rebar started to 'slide' in the unfrozen, muddy ground (see pic below). this allowed the bottom of the boards to be pushed out from the pressure of the water and freezing of the ice (the freezing water below the ice sheet pushed outward b/c the ice was too heavy to push 'up'). the upper parts were held in place by the angled 2x4s, so the boards tilted a fair amount. it's impossible to fix mid-season, so i added a bunch more rebar and support boards in the deep end. hopefully they'll last till the end of the season. next year i WILL make the 2x4' angled supports a little smaller so they attach 1/2 up the board (at the 2' mark), instead of at the current 3' high mark. i may also add a horizontal 2x4' to create a triangle-shaped support so that the angled 2x4's are physically connected to horizontal supports & rebar. and if the yard is really level, i'll only need 4-5" of water, which is a LOT easier to contain than 16".
CONNECTING BOARDS - i got away with long screws holding the boards to each other this year, but next year (once the ground is leveled and all the boards line up along the top), i'll connect with a carriage bolts near the top and near the bottom. once the ice started to freeze some separation occurred at the corners of the deeper end.
SNOW - i read that snow left on the ice will kill it. so i was ready to shovel after every snowfall. but the first big snowstorm this January started on a FRI night and lasted thru early SUN morning, dumping almost 30". there were heavy winds, so the rink wasn't completely covered in snow but the time i went out to shovel SUN morning. the uncovered and slightly covered portions of ice were fine. BUT.... all the ice under the deeper snow (4" or more) was turned to hard slush, which was over 2/3's of the rink. ugh. there was NO separation between the ice surface and the snow which made it difficult to clear the snow. i shoveled as much of the snow as i could, but in the end, those sections ended up being either 1-2" above or below the good ice (see picture below). once it froze it became VERY crusty and uneven. i'm hoping the warmer temps coming this week will melt the surface enough to level it out again. LESSON LEARNED: even if i have to go outside every hour through the night, i will NEVER again wait until the snow has stopped to shovel it off the ice. i'm guessing this mistake has set me back over a week before we'll have the ice back, assuming all goes well. i've seen some guys have a dedicated snow blower for their rink. if i can find a smaller one at the right price, i'll probably do the same. UPDATE: after this we had a 2 week warm spell, during which we lost a ton of water (ice dropped 6"). but the good news is that the warm spell appears to have helped the ice re-level itself. still not perfect, but certainly way better than after the snowstorm. two weeks later i'm ready to start resurfacing with hot water to get it skateable again with the sub-zero temps coming this weekend, but here comes more snow tonight! not much snow expected, but the warm weather has made the ice too thin to walk on, so i don't know if i'll be able to shovel off the snow in the morning. if i can't shovel it off, i plan to soak the snow before it freezes and hopefully build a layer of ice on top with the snow. we'll see.....
RE-SURFACING - HOT water definitely works much better when resurfacing the ice. i tried a few times with 'straight out of the hose faucet' cold water, but it gave an uneven surface. letting the hot water flow out onto the ice as i moved the hose around did an OK job, but using a hand-made "rink rake" or "handboni" was the best method (see YouTube on how to make your own, made from PVC, I connected to the laundry room hot water faucet and ran it out the window). unfortunately, our best ice was the night before the big snowstorm that wrecked the ice. it's been 2 weeks and we haven't skated since. in the spring i plan to put an outdoor hot water faucet to use for the rink, then i won't have to leave the window open while i'm resurfacing.